 How-to
How Do You Identify Food Safe Solder for Distilling?
Last Updated: November 15, 2026
Quick Summary
To identify food safe solder for distilling, read the spool label and confirm it is lead-free with no cadmium or antimony, ideally a tin-copper or tin-silver alloy such as Sn97Cu3 or Sn96.5Ag3.0Cu0.5. Look for a printed lead-free claim and a standards reference like ASTM B32 or NSF/ANSI 61, then screen unlabeled spools with a lead test swab.
- Sn means tin, Cu copper, Ag silver, Pb lead, Cd cadmium, and Sb antimony on alloy labels.
- A spool marked Sn60Pb40 is 60% tin and 40% lead and has no place on a still.
- Silver bearing solder is safe only when the alloy is lead-free and cadmium-free.
- Clean the joint with isopropyl alcohol, scrub with warm water, and dry fully before use.
- Ask makers for the full alloy code, the filler standard, the flux type, and cleaning records.
Table of Contents
- Why Food Safe Solder Matters in Distillation
- Step 1: Read the Alloy Label and Certification Marks
- Is Silver Bearing Solder Safe for Your Still?
- Lead Free Solder for Copper Stills: What to Look For
- FDA Food Grade Solder Standards and What They Require
- Step 2: Test for Lead and Check the Flux Residue
- Common Mistakes That Compromise Joint Safety
- Choosing a Still Built With Verified Food Safe Solder
- Frequently Asked Questions
Why Food Safe Solder Matters in Distillation
Identifying food safe solder for distilling is the first thing we tell every new customer to do.
Heat, acidic wash vapor, and time all work on a joint together, so a filler that seems fine on a cold water pipe may not belong anywhere near a distillation run.
Below, we walk through how to check an alloy, what the spool numbers mean, and where cheap solder goes wrong.
Step 1: Read the Alloy Label and Certification Marks
Start with the spool itself. The label tells you the alloy composition, and that number is your first and best filter.
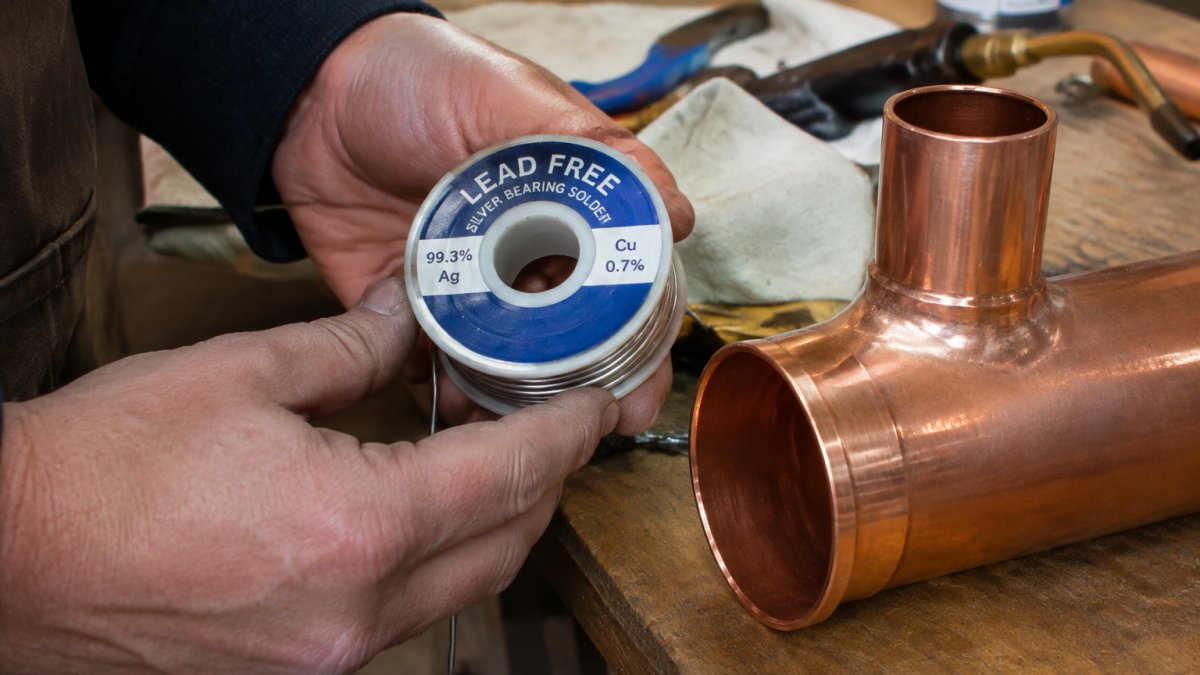
Look for three things on any label:
- The alloy code, such as Sn97Cu3 or Sn96.5Ag3.0Cu0.5
- A lead-free claim, printed, not handwritten
- A standards reference, such as ASTM B32 or NSF/ANSI 61
If the label is vague, walk away. For a deeper walkthrough of decoding these marks, see our guide on how to identify lead-free solder.
What the Numbers on the Spool Actually Mean
The letters are chemical symbols and the numbers are percentages by weight. Sn means tin, Cu means copper, Ag means silver, Pb means lead, Cd means cadmium, and Sb means antimony.
So Sn96.5Ag3.0Cu0.5 is roughly 96.5% tin, 3% silver, and half a percent copper, a clean, lead-free alloy with good joint integrity on copper.
The label on the spool is your first and best filter, so check these marks before anything else.
| What to look for | Example | Why it matters |
|---|---|---|
| Alloy code | Sn97Cu3 or Sn96.5Ag3.0Cu0.5 | Tells you the exact composition |
| Lead-free claim | Printed, not handwritten | Confirms no lead is intended |
| Standards reference | ASTM B32 or NSF/ANSI 61 | Shows the filler matches a published spec |
| Vague label | No alloy code or claim | Walk away |
Is Silver Bearing Solder Safe for Your Still?
Yes, silver bearing solder is safe when the alloy is lead-free and cadmium-free. Silver can improve flow and joint strength. The key word is lead-free; silver content alone tells you nothing about lead.
Two spools can both say "silver solder" while one contains lead and the other does not. Always check the full alloy code, not the marketing name. Our article on whether silver bearing solder is safe covers the full breakdown.
Our stills are built with lead-free silver bearing solder.
Lead Free Solder for Copper Stills: What to Look For
Copper is a demanding surface to solder, and not every lead-free alloy behaves well on it. Tin-copper alloys need more heat than old tin-lead mixes and do not flow as freely, so a partial bond leaves a pinhole that can weep vapor.
What we look for on a copper still:
- A tin-copper or tin-silver-copper alloy with a melting point that suits copper's thermal conductivity
- A compatible flux that cleans the copper oxide without leaving a corrosive residue
- Good capillary action, so the filler pulls into the seam instead of sitting on top
If you are picking a wire for a specific build, our guide on choosing the right solder wire walks through selection criteria.
FDA Food Grade Solder Standards and What They Require
No single federal rule is titled "FDA food grade solder." Instead, food-contact equipment is judged against a set of standards that together define what safe means.
The NSF/ANSI 61 drinking water standard sets limits on how much metal can leach into water from a wetted surface. Distillation equipment that touches condensate falls into that same conversation. The U.S. Environmental Protection Agency's lead-free guidance explains why lead is the first thing to screen for.
Here is the practical version. A food grade solder should be:
- Lead-free, with no cadmium and no antimony
- Made to a recognized filler metal standard
- Paired with a flux that leaves no active residue
What Each Standard Actually Covers
The acronyms are not interchangeable, and knowing what each governs tells you what a maker can and cannot claim:
- ASTM B32 is the filler metal specification. It defines alloy compositions, melting ranges, and test methods. A spool that cites ASTM B32 tells you the alloy matches a published composition, not that the joint is food safe.
- NSF/ANSI 61 is a drinking water system component standard. It sets limits on how much of a contaminant can leach from a wetted surface into drinking water. A solder or flux certified to NSF/ANSI 61 has been tested for leaching, which is closer to what a still needs than an alloy code alone.
- Lead-free plumbing rules set the maximum lead content for pipes, fittings, and solder in potable water systems (the EPA). They are a floor, not a ceiling, and a solder that meets them may still contain antimony or cadmium.
What to Ask a Maker to Document
A spec sheet that says "food safe" is a marketing claim. A spec sheet that names the alloy, the standard, and the flux is documentation. Ask for:
- The full alloy code, such as Sn96.5Ag3.0Cu0.5, not just "silver solder."
- The standard the filler is made to, such as ASTM B32, and the alloy designation within it.
- The flux type and whether it is intended for food-contact or potable water service.
- Whether the finished joint was cleaned and inspected, and how.
If a maker cannot answer those four questions, the claim is unverified. That is not proof of unsafe solder, but it is proof that nobody checked.
Where the Standards Fall Short for Distilling
None of these standards was written for a still. NSF/ANSI 61 tests with drinking water, not acidic wash vapor or high-proof condensate.
That gap is why the identification steps in this guide matter more than any single certificate. The standard tells you what the alloy is supposed to be.
Watch out: a certificate for the solder spool does not certify the finished still, because flux choice, joint technique, and cleaning all sit outside the filler metal standard.
Step 2: Test for Lead and Check the Flux Residue
A label can lie, and a secondhand spool often has no label at all. That is where a lead test kit earns its keep. Swab kits are inexpensive and give you a color change in minutes.
Flux residue is the other half of the check, and the half most hobbyists skip. Flux cleans the joint while you solder, but leftover residue can trap moisture and acids against the seam, so corrosion resistance drops and the joint fails from the inside.
Using a Lead Test Swab on Solder and Existing Joints
A lead test swab works by changing color when it contacts lead ions. The protocol is simple, but the interpretation matters:
- Clean the surface with isopropyl alcohol and let it dry. A dirty surface gives a false negative.
- Activate the swab per the kit instructions, then rub it firmly on the solder bead or the spool wire for the time the kit specifies.
- Compare the color change to the kit's chart within the stated window. A pink or red change indicates lead; no change indicates lead below the kit's detection threshold.
- Test a known lead-free control and a known leaded control if the kit includes them, so you can see what a positive and negative look like.
Swab kits are a screening tool and are not a certification of lead-free content. Treat a negative swab as a screening result, not a certificate. For existing equipment, test the solder bead at several points along the seam, because a repair may have used a different filler than the original build.
Watch out: testing a hot joint or a flux-coated surface gives unreliable results, so clean and cool the area first.
Flux Types and Why Residue Matters
Flux falls into three families, and each leaves a different residue:
- Rosin and rosin-based fluxes leave a sticky, amber residue that is mostly non-corrosive but can trap moisture and dust. It is the easiest to remove and the least aggressive on copper.
- Water-soluble fluxes leave a residue that is actively corrosive if not removed, because the activators are designed to be washed away. They clean copper well but demand a thorough rinse.
- No-clean fluxes leave a thin residue designed to be left in place. On a still that assumption fails, because the joint sees acidic vapor and repeated thermal cycling the flux was never formulated for.
For a still, the safest choice is a rosin-based flux paired with a complete removal step, or a water-soluble flux followed by a thorough rinse and dry. Avoid any flux labeled for plumbing only, because those formulations are not intended for food-contact surfaces.
A Residue Removal Protocol That Actually Removes Residue
A wipe is not a removal protocol. Residue sits in the crevice between the filler and the copper, and a cloth passes over it. Use this sequence instead:
- Let the joint cool fully. Hot flux residue smears and drives deeper into the seam.
- Wipe with isopropyl alcohol and a clean cloth to lift the bulk of the residue.
- Scrub the seam with a stiff brush and warm water, working along the bead rather than across it. A toothbrush reaches the crevice better than a rag.
- For water-soluble flux, rinse with distilled water and repeat until the rinse water runs clear.
- Dry completely before the still sees any vapor. Residual moisture under a flux film is what starts the corrosion cycle.
Inspect the seam under bright light after drying. A white or green film at the edge of the bead means residue remains, and the joint should be re-cleaned before use. A clean joint shows bare copper and a uniform solder bead with no chalky halo.
Inspecting the Joint After Cleaning
Cleaning is only half the check; a poorly made joint will not be saved by a good wipe. Look for a concave fillet where the solder meets the copper, a smooth bead with no pits or cracks, and no dark or green staining at the seam edge. A convex, blobby bead usually means the joint was overheated or under-fluxed, and a pitted bead means gas was trapped during soldering.
Common Mistakes That Compromise Joint Safety
The biggest mistake is trusting the word "silver" on a spool without reading the alloy code. The second is using plumbing-grade solder because it was on the shelf. Plumbing solder was not always lead-free, and some of it still is not.
Other mistakes we see:
- Overheating the joint, which burns the flux and leaves a brittle bond
- Skipping flux, which causes oxidation and a weak seam
- Not cleaning the copper first, so the filler never bonds to bare metal
Catching a bad joint early is easier than fixing one later. Our guide on spotting poor soldering lists the visual signs that a seam is failing.
Choosing a Still Built With Verified Food Safe Solder
The safest path is to skip the guesswork entirely.
That is how we build at Steven StillZ LLC. Every still uses Paul Revere Copper, 20oz, 99.9% pure copper, joined with lead-free silver bearing solder.
If you would rather verify a still than build one, you can shop stills built with verified food-safe solder and see the spec sheet for yourself.
The real challenge is not finding solder. It is finding a still where the maker can prove what went into every joint.
Frequently Asked Questions
Is silver bearing solder safe for distilling?
Silver bearing solder is safe for distilling when it is lead-free and cadmium-free. Silver content improves joint strength and flow when the alloy is lead-free. Check the label for a lead-free claim and an alloy designation such as Sn96.5Ag3.0Cu0.5. Avoid any silver solder that lists lead or cadmium in the alloy. A food safe solder for a copper still should carry a clear composition and a compliance statement, not just a marketing phrase on the package.
What is the difference between plumbing solder and food-grade solder?
Plumbing solder is formulated for potable water lines and may contain antimony or other metals that are not evaluated for food contact. Food-grade solder is made from alloys like tin-silver or tin-copper with no lead, cadmium, or antimony, and it meets FDA food contact surface requirements. Plumbing grade solder can also include acid flux cores that leave corrosive residue. For a copper still vapor path, use a lead-free, cadmium-free solder paired with a water-soluble flux, then clean the joint thoroughly.
Does lead-free solder mean it is food safe?
No. Lead-free only confirms the absence of lead. A solder can be lead-free and still contain cadmium or antimony, both of which are unsafe in a vapor path. Look for a label that says lead-free, cadmium-free, and antimony-free, and check for an FDA food contact compliance statement. Testing kits for lead are available from many suppliers, and pricing varies by vendor.
Can I use standard electrical solder for a copper still?
Do not use electrical solder in a still. Most electrical solder uses rosin flux cores designed for circuit boards, and the residue is not meant for food contact surfaces. Some electrical alloys also include metals that are not safe in an acidic vapor environment. The flux residue can trap contaminants and corrode over time. Use a lead-free, cadmium-free solder with a food-safe flux, and remove all residue after soldering to protect distillate purity.